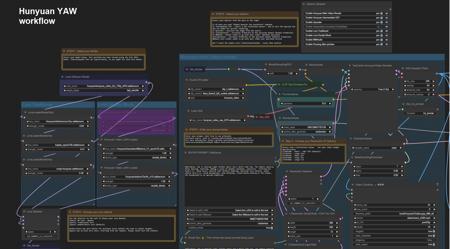
Workflow highlights:
-
Audio Generation - via MMaudio - Render Audio with your videos
-
FAST preview generation with optional pausing
-
Preview your videos in seconds before proceeding with the full length render
-
-
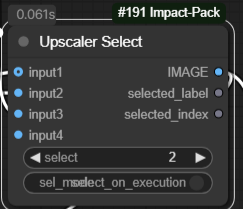
Multiple Upscale Methods -
-
Standard Upscale
-
Interpolation (double frame-rate)
-
V2V method
-
-
Multiple Lora Options
-
Traditional Lora using standard weights
-
Double-Block (works better for multiple combined loras without worrying about weights)
-
-
Multiple Resolutions
-
Quickly Select from 5 common resolutions using a selector.
-
-
Prompting with Wildcard Capabilities
-
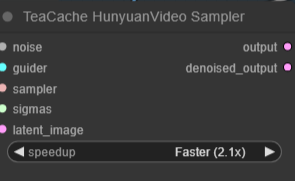
Teacache accelerated (1.6 - 2.1X the speed)
-
All Options are toggles and switches no need to manually connect any nodes
-
Detailed Notes on how to set things up.
-
Fully tested on 3090 with 24GB VRAM
This is my first workflow. I personally wanted options for video creations so here is my humble attempt.
Additional Details:
I am new to AI and comfy, this is my first workflow I loved the "Hunyuan 2step t2v and upscale" workflow - https://civitai.com/models/1092466/hunyuan-2step-t2v-and-upscale and it was highly used as the base. So should work on the same set-ups as the original.
By Default- everything has been setup according to the Hunyuan 2step t2v and upscale workflow. But with all the new toggles you have more options. Any Nodes marked in Green are the only ones you should need to touch.
If your audio nodes aren't loading. Please go to ComfyUI Manager, and do an "install via Git URL" with this address:
https://github.com/kijai/ComfyUI-MMAudio
then restart. Any additional information can be found on that website.
All toggles and switches:
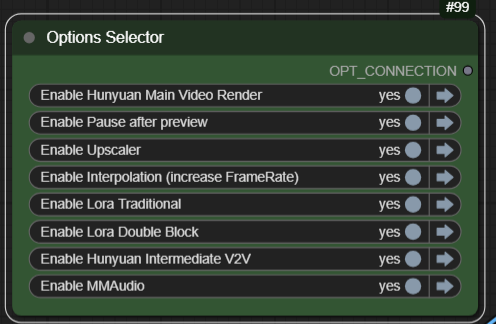 You should never need to rewire anything in this workflow. Detailed instructions and comments right inside the workflow.
Lora Options:
Traditional Lora and Double Block can be used, Double-Block is default.
Double-block seems to do better with multiple lora's without having to worry about adjusting weights as often.
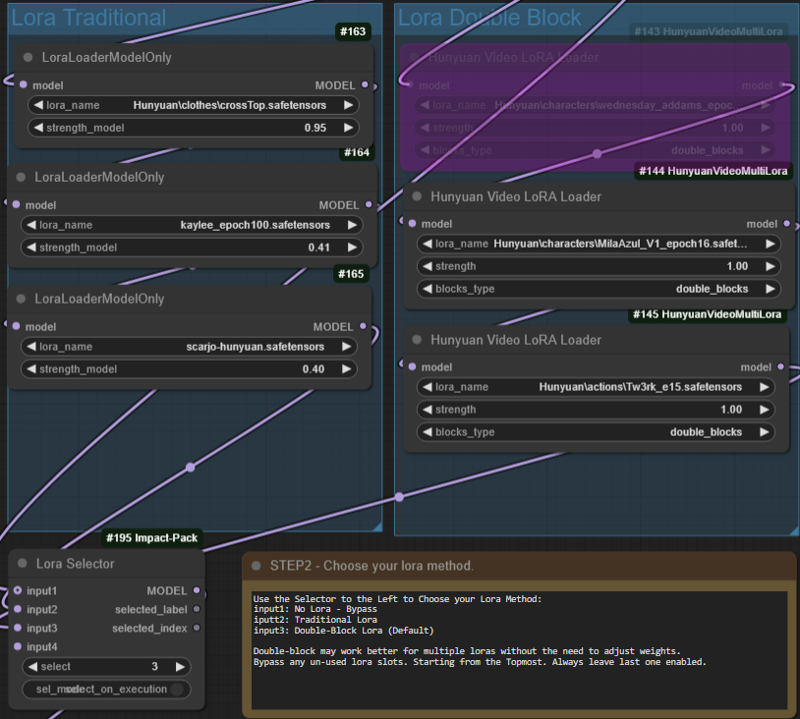 You can select which type of lora to use in the option.
Input 1 - To bypass loras completely
Input 2 - Traditional Loras - with multiple loras you will need to play with the weights
Input 3 - Double Block (Default) don't need to mess with weights as often, multi-loras work better with this.
This workflow has be setup to use up to 4 loras. If you only need 1 or 2 lora's, please right click on the unused lora selector and choose "Bypass". Make sure you do this from top to bottom, always leave the bottom most lora enabled if you only have 1 lora needed.
Resolution Options:
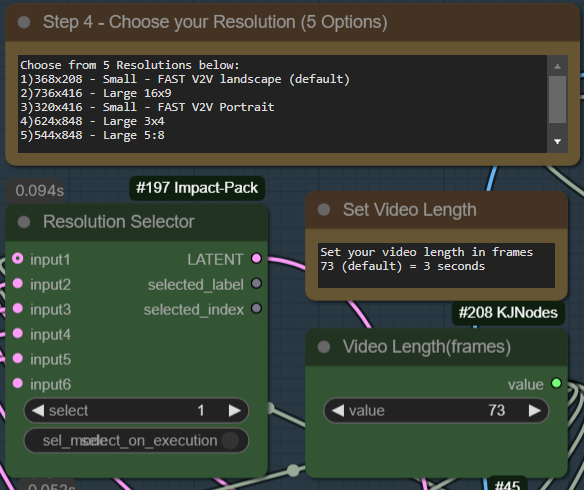 Select from common resolutions - or edit the 5 to make them your own. Change resolution with the "Resolution Selector" By Default the fastest smallest resolution is selected intended to go to the next V2V portion of the workflow. As you increase to the larger resolutions your render times will take much longer.
Adjust the length of your video here. 73 Frames is the default setting. Video is 24 frames per second, so 73 frames=3 seconds. Note the longer your videos the higher chance you will run out of memory. Find the right balance between resolution and video length!
Pause after Preview - (On by default)
Video generation takes too long, experimenting with multiple loras or getting your prompt right takes so long when video render-times are slow. Use this to quickly preview your videos before going through the additional time to upscale process. By Default this is Enabled. After your start the workflow, it will quickly render the fast preview, then you will hear a chime. Make sure you scroll to the middle section beside the video preview for next steps.
Upscale the previews you like, or cancel and try again!
1) Continue the full render/workflow - Select ANY image (It doesn't matter which one) and click "Progress Selected Image"
2) Cancel - click "Cancel current run" then queue for another preview.
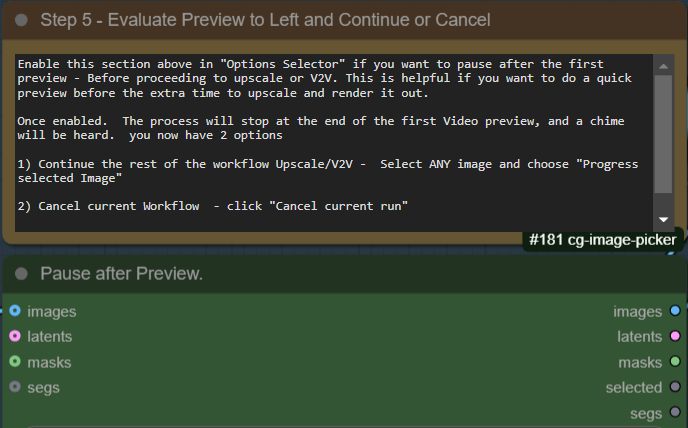 To disable this feature, toggle it off under "Options Selector"

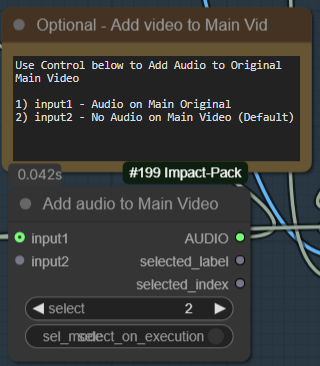
MMaudio - Add audio automatically to your video
By Default it will only add audio to upscaled videos. However there is a switch to enable it for all parts of the render process. Be sure to add any audio details to your prompt for better generation.
Interpolation after Upscaling
This option lets you double the frame-rate of your rendered video, by default "enabled"
you an disable it from the "Options Selector". This can slow down your render if you don't need it.

I feel the need, the need for Speed
Things running too slowly? you can increase the Teacache Speed up to 2.1X at the sacrifice of minimal quality. Default is Fast (1.6X). Please note there are 2 Teacache Sampler nodes.
Prompting and Wildcards
Please enter your prompt int he Green "Enter Prompt" Node. *** Please ensure your prompt doesn't have any linefeeds or new lines or it will change the way the system processes the workflow.
Using Wildcards is a feature that can allow you to automatically change your prompt or do overnight generation with variances. To create wildcards. you will need to create a .txt file in the folder /custom_nodes/ComfyUI-Easy-Use/wildcards. Create a wildcard on each line. Pressing enter to separate each wildcard. You can use since words, or phrases. As long as they are separated by a "enter" Do not double space. Here are 2 example wildcard files.
color.txt
red
blue
green
locations.txt
a beautiful green forest, the sunlight shines through the trees, diffusing the lighting creating minor godrays, you can hear the sound of tree's rustle in the background
a nightime cityscape, it is raining out, you can hear the sound of rain pitter patter off of the nearby roofs
a clearing in the forest, there is a small but beautiful waterfall at the edge of a rockycliff, there is a small pond and green trees, the sound of the waterfall can be heard in the distance, birds are chirping in the background
To use these in a prompt you can click the "select to add wildcard" and add them at the appropriate spot in the prompt.

ellapurn3ll is wearing a __color__ jacket ,she is in __locations__.
Full details on this custom node can be found here: https://github.com/ltdrdata/ComfyUI-extension-tutorials/blob/Main/ComfyUI-Impact-Pack/tutorial/ImpactWildcard.md
Tips for how to use the workflow
Fast, V2V method,Double Lora (Default) - this follows the original work flow.
-
Quick Preview using a fast low res video: Use
-
(Resolution 1 - 368x208) for landscape video
-
(Resolution 3 - 320x416) for portrait video
-
-
Pause to decide if you want to do the full render
-
Full render includes audio, upscaling and interpolation
T2V straight to upscale method
-
Render at medium or high res, then use the upscaler, audio
-
Use Resolution 2, 4, 5 options for higher res - slower render. I personally use resolution 4 for most generations
-
Will Upscale and add audio
Setup
Disable "Intermediate V2V" from Options menu
 Select input 2 on Upscaler Select
Wildcards/Seeds and keeping consistentcy between preview and higher res renders (Non V2V)
Often i want to generate many quick previews to find the right video. V2V is good, but i do find it can change the video somewhat and may lose a bit of detail due to the original first render.
1) Setup using the "T2V straight to upscale method" from above.
2) Create previews using one of the FAST Resolutions (Resolution 1 or 3).
3) Once i find the right preview. I go to RandomNoise - set that value to fixed - so it will stay the same as my last preview. 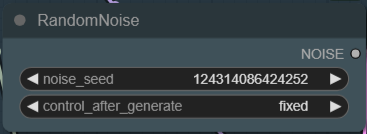 4) If I used wildcards, I copy and paste the actual prompt from the "Show Text" field into the prompt field.
5) Change my resolution to one of the Large higher res. ie Resolution 2 or 4. Then Queue. For the most part, I get the same video only in a higher res. Please note that by default the Large resolutions are double the res of the small counterpart this helps maintain consistency when using this method. Please always use the same aspect ratios ie. 1--> 2, 3--> 4
That's all folks. all credits to all of the original authors of all of this.
Hope you enjoy. Great to be part of such an open and sharing community!
描述:
v4.1 unhide the Basic Scheduler in the V2V tab - was accidentally hidden under the Video Combine Window
v4. Cleaned up flow, QOL enhancements and bugfixes.
Tested on RTX3090, but should run on lower VRAM Systems with default settings.
训练词语:
名称: hunyuanYAWYetAnotherWorkflowFastT2v_v4.zip
大小 (KB): 11
类型: Archive
Pickle 扫描结果: Success
Pickle 扫描信息: No Pickle imports
病毒扫描结果: Success