ComfyUI Flux Redux Granular Image Blender
This workflow is a designed to utilize the recently released FLUX.1-Redux-dev.
With this model, not only do we get the capability to easily create variations of existing images/generations, it also enables us to blend images together with various blending options by way of manipulating the CLIP conditioning.
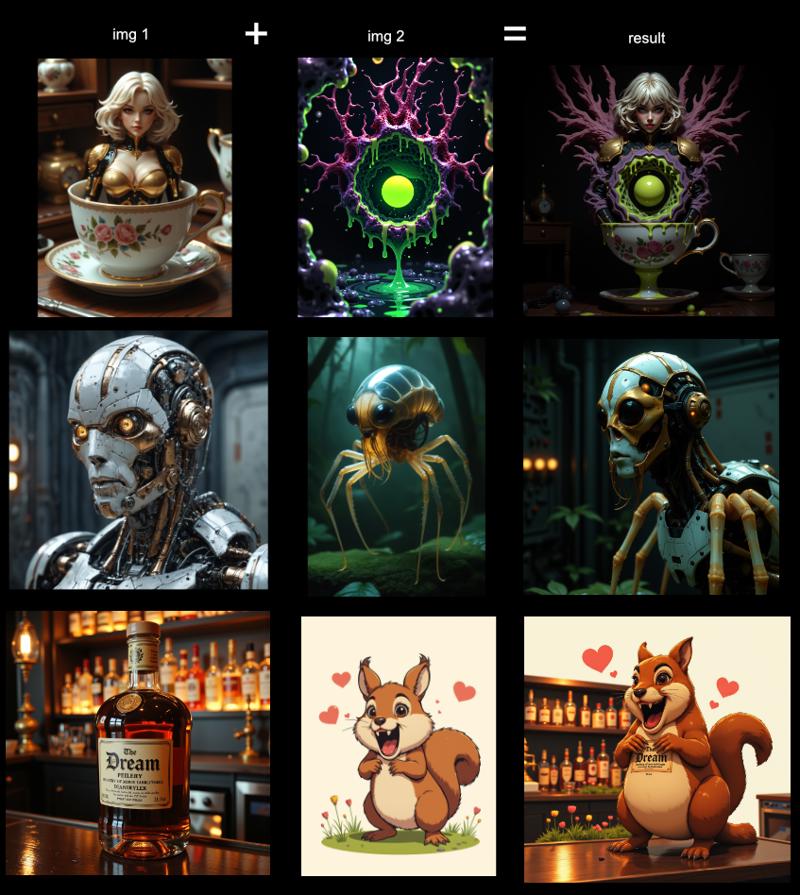
EXAMPLES: (usage instructions below)

INSTRUCTIONS:
You will need ComfyUI
You will need ComfyUI-Manager
(if you still need to install these, carefully follow the installation instructions on those linked pages)
You will need some custom nodes in order to use this workflow. You can obtain them by opening this workflow after installing the ComfyUI-Manager, and installing missing custom nodes before using it.
Custom nodes and where to find them:
ComfyUI-GGUF (if using the GGUF workflow for a FLUX GGUF Quant)
ComfyUI-RvTools (Sometimes does not appear in missing custom nodes, search for it in the manager or install manually)
(Remember, you can clone these repos into your custom_nodes folder in order to install them manually, but I recommend just using ComfyUI Manager)
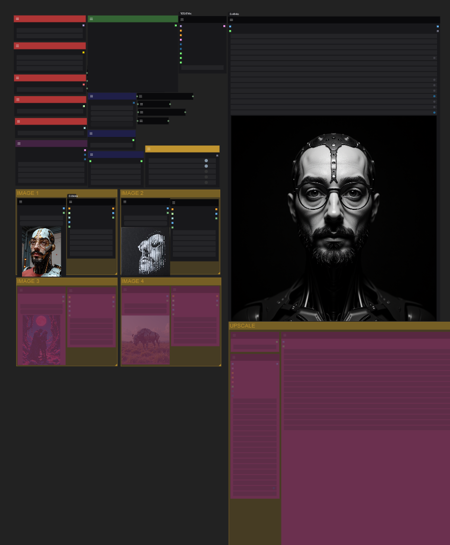
I've organized this workflow into various groups in order to better articulate how to use it.
The LOADERS group: This group contains all of the model loaders. Make sure you go through this and make sure you have all necessary models. You will need a Flux.1 Dev Model (custom or official, GGUF or Safetensors. Make sure you download the correct workflow for your model), Flux Redux Dev (for the style model node), Both the t5xxl and CLIP_L files from HERE, The AutoEncoder (download diffusion_pytorch_model.safetensors and rename to ae.safetensors), and THIS SPECIFIC CLIP Vision.
All of these things are necessary to use this workflow.
The PROMPT & SETTINGS group: This group contains the node where you will include your text prompt. In my experience, text prompts have very little effect for this type of workflow. You can get more out of it by adjusting the Conditioning Average in the PROMPT/IMAGE BLEND node.
Other general nodes related to the prompt will be found here, such as:
-
Empty Latent Ratio Select (for resolution/dimensions)
-
Flux Guidance. (Default is 3.5, but feel free to experiment with this. I believe it may manage to give the prompt more weight at higher values but have not tested it with blending yet.)
-
Random Noise: Generate and Control your seed generation
-
KsamplerSelect: Select your sampler (euler is the standard)
Basic Scheduler: Select your scheduler, choose steps, and denoise. (denoise should stay at the default 1.0 value unless the workflow is being modified for an img2img input, and 20 steps is adequate, though 32 steps gets better results.)
PROMPT/IMAGE BLEND group: This group is the first option for your blending method. It allows you two options.
-
Conditioning Average: This allows you to use an average between either the conditioning from your text prompt, or the conditioning from the Image Blend. A value of 1.00 on the conditioning average node will use only the Image Blend conditioning, and a value of 0.00 will only use the text prompt, and generate an image based only on your text prompt. (Through testing, Ive found that the text prompt only starts working noticeably below a value of 0.20)
-
Conditioning Switch: (1 = Conditoning Average, 2 = Conditioning Concat) This allows you the option to switch between using the Conditioning Average node, or to instead use a Conditioning Concat node. Concatenation will instead include the entire conditioning from your text prompt AND your Image Blend. (This is not so effective and usually leans more towards the Image Blend conditioning.)
IMAGE BLEND group: This is the meat and potatoes of the workflow. It works similarly to the PROMPT/IMAGE BLEND group, but instead of mixing text/image conditioning, it focuses on blending the two images, affecting the conditioning that the PROMPT/IMAGE BLEND group uses to weigh against the text prompt.
-
Conditioning Average: This average will be the weight of the different images against each other. A value of 1.00 uses 100% of Image 1(left), while a value of 0.00 will use 100% of Image 2 (right).
Conditioning Switch: (1 = Conditoning Average, 2 = Conditioning Concat) This switch allows you to use either the Conditioning Average or Concatenate the Conditioning of each image instead of averaging them. This tends to bring the concepts of both images into the result quite clearly and is what I used for the provided examples. It's my favorite configuration for this workflow.
And that's It!
Go create some cool stuff with this!
描述:
训练词语:
名称: comfyuiFluxRedux_v20.zip
大小 (KB): 6
类型: Archive
Pickle 扫描结果: Success
Pickle 扫描信息: No Pickle imports
病毒扫描结果: Success


