Greetings, everyone, and welcome to my first CivitAI upload!
I made this workflow to fit a specific need I had - processing a large amount of potential images of various sizes for LORA/Checkpoint training. When training, you can't batch across buckets so I prefer to have all of my training images the same size, or split among a small number of matching sizes - and especially now with Flux, the ability to make them all square. But I don't like cropping my images and losing important details. And I also for a while tried adding blank padding to my images but this padding occasionally presents itself in letterboxed images generated with my LORA. My final idea was to use outpainting to fill in the blank space - but how to do it effectively AND in bulk?
This workflow begins with the option to choose between batch images from a folder or processing a single image. If you choose batch, be sure to check the "Extra Options" box in your ComfyUI control panel, and set your batch size to the number of images in your batch folder. If doing a single image, set it back to one. The batch loading node only knows to process one image and then advance to the next image. The ComfyUI batch count box tells it to run the whole process again for each next image.
For each image, this workflow will query for BLIP tags to create a positive prompt for the generated outpainting image. There is also an Additional Prompts section for adding your own custom positive and negative prompts which will be added to it. You will find in the models section, the ability to choose from different BLIP models you have downloaded, as well as the various settings for the BLIP analyzer in the processing section.
You may also choose your primary checkpoint for generating images - STRONGLY recommend using an inpainting checkpoint. I am using AIDutcHY's epicrealismXL_v8Kiss inpainting model merge with great results.
epiCRealism XL Inpainting > https://civitai.com/models/590835/epicrealism-xl-inpainting
Credits to original models
https://civitai.com/articles/3990
https://civitai.com/models/277058
edit: I'd also like to give a shout out to Jonas716's ImgFixer PreV0. 3 embedding.
I added this to my positive prompt box and the quality of my outpaits increased significantly.
https://civitai.com/models/139688/imgfixer-or-negative-ti
In the Output Image Size group, you will find preset with the settings I have been using to generate a 1024x1024 final image. You can change this if you want, but you may have to play with your feathering and grow mask settings to get good results. I have been using grow mask 32 and feathering 128 for 1024x images to produce reasonably consistent results that avoid showing seams. The box on the left will resize your input image to fit its target size while maintaining aspect ratio, and then the box on the right will center the result in its own target size and fill the remaining space with outpainting mask. You can set a smaller initial image size than the target outpaint size if you want to create an outpainted border the whole way around. Also, while I prefer to separate my images somewhat ahead of time so that I will only be downsizing, if you choose to let it load images smaller than your target there is also an option for which upscaling method to use.
Lastly, because outpainting is a fickle mistress, the Selective workflow generates four potential output images for each input and sends them to a preview selector. You will find four KSampler boxes in the Output Image Settings where you can select your sampler/scheduler/steps etc for each. This is not a "set it and forget it" batch. You will choose your favorite from four outpainted options for each image in the batch. You will most likely still have a few duds. This is why there's a single image option to go back and retry the failures individually.
Alternatively, the Automatic workflow has up to four image streams which can be individually activated. Each image loaded in the batch will be processed through each active stream generating and saving a unique outpaint for each. As a bonus, each of these streams can be set with its own scheduler/steps/cfg/etc, as well as its own savename prefix and output folder.
** NEW **
Do you like the idea of selective mode, but you didn't shell out sports car prices for an H100 and waiting for each set of four images to generate is excruciating?
Do you like the convenience of automatic mode, hitting "Queue Prompt" and coming back later when it's finished but find manually deleting all the rejects to be a hassle?
Well now you can have the best of both worlds. The Automatic v2.0 add-on is a simple file selector workflow that can load batches of any number of images at a time to a grid and you can select which one to keep. It does not load any generative processes and therefor has VRAM requirements of potato and loads almost instantaneously.
Again, you can use Comfy's batch count box to move from one set to the next automatically, or you can simply hit "Queue Prompt" each time you want to load the next set. The nice thing about advancing manually is it allows you to hit "Queue Prompt" without selecting anything and advance to the next set of images without saving from the current set if you decide this entire set are duds.
It also doesn't care where the images came from, so you are not required to use it with my workflows. It will process any folder with sets of matching images you wish to pick favorites from.
The few basic options that need to be set based on how many images you have per set and how many images in the entire folder have notes included in the workflow to tell you where to put them, and there is also a boolean node to reset your counter to zero in case you need to restart the entire folder batch from the beginning.
Installation /Requirements info:
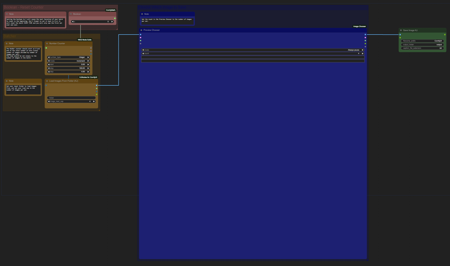
Sorry in advance for the noodle salad, I cleaned it up somewhat and if you have your links set to "Straight" in your settings it's still pretty easy to see what's going on.
Custom nodes you can get through manager are WAS Node Suite, rgthree's ComfyUI Nodes, and KJNodes for ComfyUI. Make sure your nodes are up to date. There was an error in a previous version of KJNodes that caused the Target Image node not to use the correct size. You can also install ComfyUI Essentials if you want the mask preview node to work, but that was mainly there for testing and you can just delete the node if you don't need it.
Custom node you will need to install from Git, cg-image-picker.
https://github.com/chrisgoringe/cg-image-picker
If you don't currently have BLIP models installed, it should automatically download the ones I'm using from Huggingface. Your first run, it will seem to hang for a bit on the BLIP analyze step while acquiring them, then resume once they're collected. If you need to install them manually you can find them here and place them in your models/blip folder.
https://huggingface.co/Salesforce/blip-image-captioning-base
https://huggingface.co/Salesforce/blip-vqa-base
描述:
A separate workflow to batch image selection from a folder of images previously generated by Automatic v2.0, but also works on its own to load any number of images to a selection grid. No actual Stable Diffusion processing involved, very fast.
训练词语:
名称: nabbysSDXLSingleBatch_automaticV20AddOn.zip
大小 (KB): 2
类型: Archive
Pickle 扫描结果: Success
Pickle 扫描信息: No Pickle imports
病毒扫描结果: Success