Introduction
This is my attempt at a flexible (?) generic workflow framework that includes Flux Tools (?️): Fill, Canny & Depth, and Redux. Many customizable pathways are possible to create particular recipes from the available components, without too much noodle convolution, without hiding or obscuring anything, and arguably capable of rendering results similar to some other more complicated and difficult to follow specialized workflows. Common accessory tools are included, such as Florence 2, choice of background removal tools, and upscalers. A trimmed down lite version is also included.
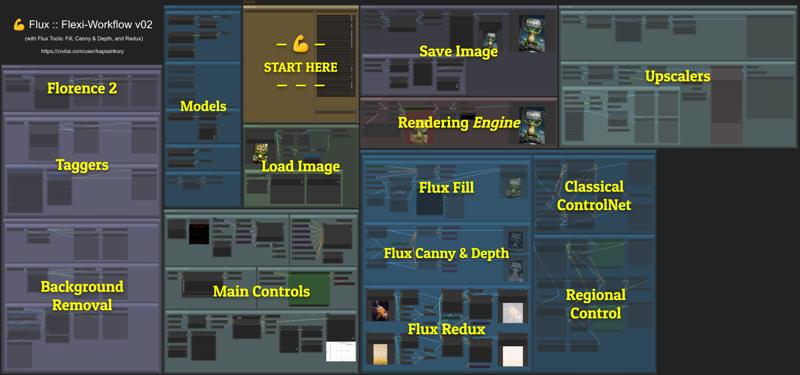 Sample recipe settings are included in the workflow for text-to-image, image-to-image, fill (inpainting & outpainting), canny & depth, redux (with one to three images), and two upscaling methods. More complex combinations are theoretically possible (e.g., depth along with redux) with minimal adjustments...but may also break things!
If you run into bugs (?) or errors (?), however, please report these, as well as your successes (?) and suggestions (?). I feel like I've run the workflow through its basic paces, but maybe not stress tested it fully, although Comfy can be pretty finicky at times anyway. I spent a lot of time working on this (for no ?), so I hope others make good use of it and find it helpful.
Installation
Quick Start
-
Install or update ComfyUI to the latest version. Follow your favorite YouTube installation video, if needed.
-
Install ComfyUI Manager.
-
Install the following models (or equivalents). Follow the Quickstart Guide to Flux.1, if needed.
-
Open the Flux :: Flexi-Workflow in ComfyUI and use the Manager to Install Missing Custom Nodes.
-
Restart ComfyUI.
-
Select active models (01) according to your folder structure.
-
Queue the default text-to-image workflow.
Additional Recommended Installations
-
For the intended core functionalities, install Flux Tools: Fill, Canny & Depth, and/or Redux. The Redux model also requires sigclip_vision_384.
-
Other "classical" ControlNets, such as X-Lab's Canny and Depth, Shakker-Labs's Union Pro, TheMistoAI's Lineart/Sketch, and/or jasperai's Upscaler and other models, are also (theoretically) supported, although results may vary. Feel free to browse for others.
-
While installation using the ComfyUI Manager is easier, version 1.1 of the workflow includes the follow custom nodes: AdvancedRefluxControl (kaibioinfo)*, Comfy [BETA] (comfyanonymous), comfy-plasma (jordach), Comfyroll_CustomNodes (Suzie1), ControlAltAI-Nodes (gseth)*, controlnet_aux (Fannovel16)*, Crystools (crystian)*, Derfuu_ComfyUI_ModdedNodes (Derfuu)*, Detail-Daemon (Jonseed), Easy-Use (yolain)*, essentials (cubiq)*, ExtraModels (city96)*, Fill-Nodes (filliptm), Florence2 (kijai), Flux_Style_Adjust (yichengup)*, flux-accelerator (discus0434), FluxSettingsNode (Light-x02)*, Fluxtapoz (logtd), GGUF (city96)*, ImageMetadataExtension (edelvarden)*, Impact-Pack (ltdrdata)*, KJNodes (kijai)*, LayerStyle (chflame163)*, LayerStyle_Advance (chflame163), Manager (Dr.Lt.Data), Miaoshouai-Tagger (miaoshouai), PC-ding-dong (lgldlk)*, rgthree-comfy (rgthree)*, RMBG (1038lab), Skimmed_CFG (Extraltodeus), UltimateSDUpscale (ssitu), utils-nodes (zhangp365), various (jamesWalker55)*, and was-node-suite-comfyui (WASasquatch)*. The included lite version requires only those designated with an asterisk ( * ).
-
Recommended upscalers/refiners include 1xSkinContrast-SuperUltraCompact and/or 4xPurePhoto-RealPLSKR, or browse the OpenModelDB.
-
Accessory models used for Florence 2, captioning/tagging, and background removal should download automatically upon first run (so just be aware of any delays and check the terminal window to monitor progress).
Recipes
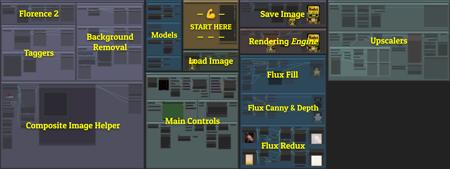
The workflow is structured for flexibility. With just a few adjustments, it can flip from text-to-image to image-to-image to inpainting or use of controlnets. Additional (unlinked) nodes have been included to provide options and ideas for even more adjustments, such as linking in nodes for increasing details.
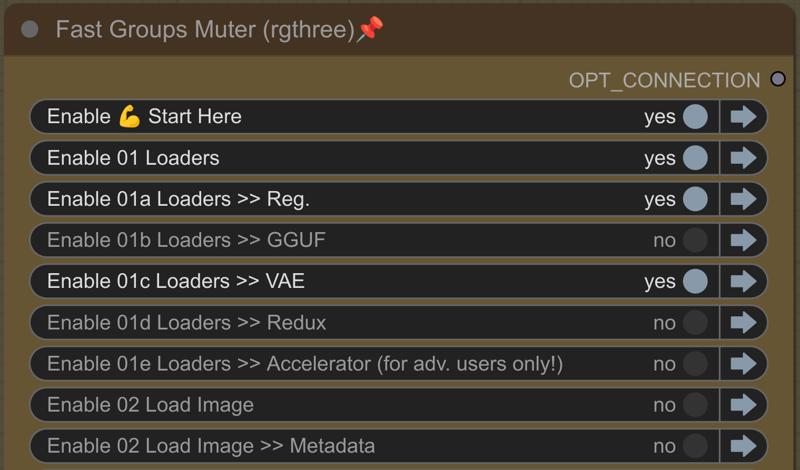
Use the ? Start Here bookmark to jump to the recipe notes and Fast Groups Muter menu. In the Fast Groups Muter menu, use the ? yes|no toggles to activate or deactivate groups and the ➡️ jump arrows to quickly move to particular groups for checking and making adjustments to the settings/switches.
 Hold down control-shift + left-mouse and move the cursor up or down to quickly zoom in or out.
Text-to-Image
This is the default recipe and should be run first to make sure you have the basics configured correctly.
? :: Toggle to "yes" ?; 01 01a (or 01b), 01c; 03 all; 06; and 07
03a :: Latent switch = 1 (empty)
03b :: Conditioning switch = 1 (no Flux tools)
03d :: Guidance = 1.2–5
03e :: Denoise = 1; Steps 20–30, or 8–12 w/Turbo LoRA
07 :: Image switch = 2 (save generated image)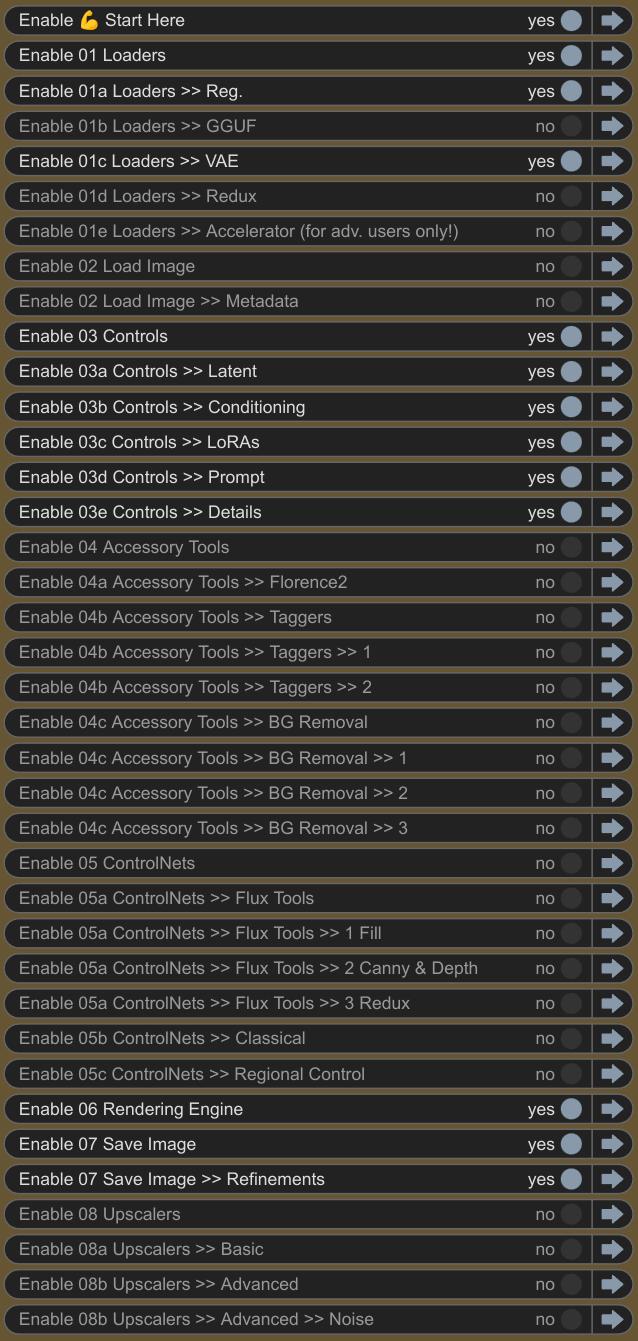 Image-to-Image
With just a couple of setting changes, the workflow now provides image-to-image rendering.
?  :: Toggle to "yes" all from TEXT-TO-IMAGE, plus 02

02  :: Load image; optionally create mask (right-click > Open in MaskEditor) for inpainting

03a :: Latent switch = 2 (incl. image)

03e :: Denoise = <1
Fill for Inpainting or Outpainting
?  :: Toggle to "yes" all from TEXT-TO-IMAGE, plus 02 and 05 05a Fill

01a :: Load Flux FILL model (or reg. model for sometimes better results); change back after inpainting

02  :: Load image; create mask (right-click > Open in MaskEditor) for inpainting

03a :: Latent switch = 3 (fill)

03b :: Conditioning switch = 2 (fill)

03d :: Guidance = 10–30

05a :: Image switch = 1 (inpainting) or 2 (outpainting)
There are nodes in 05a and 06 to optionally include inpainting crop and stitch for possibly superior results. Just connect the nodes to the existing chain.
The Redux model can also provide inpainting functionality. (In 05a Fill, the Positive input of the InpaintModelConditioning node can be changed to "Conditioning → Redux 1".)
Canny or Depth
?  :: Toggle to "yes" all from TEXT-TO-IMAGE, plus 02 and 05 05a Canny & Depth

01a :: Load Flux CANNY or DEPTH model, or use LoRA (03c) at Strength = 0.25–0.85; change back after applied

02  :: Load image

03a :: Latent switch = 4 (canny) or 5 (depth)

03b :: Conditioning switch = 3 (canny) or 4 (depth)

03d :: Guidance = 1.2–5

03e :: Denoise = 1; Steps = 5–30, or 4–12 w/Turbo LoRA
You might try running canny or depth for a small number of steps and then run image-to-image at lower denoise for refinement.
Redux
I love Redux!!! It can be used for re-rolling variations of an image, inpainting, style transfers, and more! Even with settings giving minimal influence, it can add a touch of pizzazz—and realism!—to regular Flux renders. I have found some tendency for it to give greater depth, or a three-dimensional effect, to images. However, it can also be quirky and difficult to finely control.
For starters, I recommend not loading a base image (02), just load a single image in the Redux group (05c), provide a prompt (03d), and see what you get. Adjust from there.
?  :: Toggle to "yes" all from TEXT-TO-IMAGE (or IMAGE-TO-IMAGE), plus 01 01d; 02 (for IMG2IMG); and 05 05a Redux

02  :: Load image (if 2 below); optionally create mask (right-click > Open in MaskEditor) for inpainting

03a :: Latent switch = 1 (empty) or 2 (incl. image)

03b :: Conditioning switch = 5 (incl. one redux image) or 6 (incl. two redux images)

03d :: Guidance = 1.2–5

03e :: Denoise = 0.75–1 (1 if empty latent); Steps = 20–30, or 8–12 w/Turbo LoRA

05c :: Load image(s); optionally create mask to sample (or disconnect mask node, esp. if errors)

05c :: Adjust downsampling_factor (big shifts) and/or weight (small shifts)
In the Style Model Advanced Apply nodes, set all of the weights to zero for starters. Then, experiment! If I recall, the masking can feel backwards when loading and masking a base image (so try inverting)?
Masking (05c), or lack thereof, can sometimes throw errors, I have found. Sometimes just re-queuing takes care of it, although you might also try refreshing the browser (no need to completely restart Comfy) or change the sampling mode in the ReduxAdvanced node. As a final solution, just temporarily disconnect the mask noodle to the ReduxAdvanced node.
Classical ControlNets
These should probably just be named "other" ControlNets, not provided by Black Forest Labs. Results can vary greatly, depending on the models and settings used. I recommend looking up source information of particular models to get the best results from them.
?  :: Toggle to "yes" all from TEXT-TO-IMAGE, plus 02 and 05 05b

02  :: Load image

03a :: Latent switch = 1 (empty) or 2 (incl. image)

03b :: Conditioning switch = 7 (classical controlnet)

03d :: Guidance = 1.2–5

03e :: Denoise = 0.75–1 (1 if empty latent); Steps = 20–30, or 8–12 w/Turbo LoRA
Regional Control
Beware: most of my results using regional control have been pretty horrible so far, so I definitely don't seem to have this part of the workflow configured right just yet. Also, the render times will greatly increase!!! However, I have been able to get two different LoRAs affecting two different areas of an image, which was a goal of mine...but the blending and overall coherence of the resultant image has not been so good, at all.
?  :: Toggle to "yes" all from TEXT-TO-IMAGE, plus 02 (if incl. image) and 05 05c

02  :: Load image

03a :: Latent switch = 1 (empty; recommended) or 2 (incl. image)

03b :: Conditioning switch = 8 (regional control)

03d :: Prompt for overall scene or unmasked regions; Guidance = 1.2–5

03e :: Denoise = 0.75–1 (1 if empty latent); Steps = 20–30, or 8–12 w/Turbo LoRA

05c :: Load image(s) as mask(s)

05c :: Select LoRA(s) and construct prompt(s) for region(s)
You may get improved results using mask(s) with lower opacity, not overlapping, and blurred edges for better blending and coherence. If I recall, the masking can feel backwards (so try inverting)?
Upscale (basic)
?  :: Toggle to "yes" ?; 02; 07; 08 08a

07  :: Image switch = 3 (save upscaled image basic)

08a :: Image switch = 2 (upscale loaded image)
Try including refinements (07 Image switch refinements = true) for color correction and sharpening.
Upscale (advanced)
?  :: Toggle to "yes" ?; 01 01a (or 01b), 01c; 02; 03 03b–d; 07; and 08 08b

03b :: Conditioning switch = 1 (no Flux tools)

07  :: Image switch = 4 (save upscaled image advanced)

08b :: Image switch = 2 (upscale loaded image)
Try using the Lumiere alpha model (01a) for potentially greater realism. Additionally, try including a controlnet (05 05b), such as jasperai's Upscaler. You may need to use a GGUF (01b) model for low VRAM systems.
To reduce plasticky "Flux face", first apply a soft mask with low opacity across the skin areas of your model. Then, run the upscaler with added noise (08b Image switch noise = true).
Additional Ideas
Use GetNode and SetNode nodes to alter existing pathways or create your own! For example, enable Florence 2 (04 04a) and use it for prompting (03 03d) after converting caption widgets to inputs and linking in the GetNode ("Get_Accessory Tools") nodes, which have been provided for you in the workflow (but not applied by default).
I may add additional recipes as time permits. Please add your own in the comments, or link to uploaded images with embedded workflows.
描述:
训练词语:
名称: FluxFlexiWorkflowWith_fluxFlexiV10.zip
大小 (KB): 11484
类型: Archive
Pickle 扫描结果: Success
Pickle 扫描信息: No Pickle imports
病毒扫描结果: Success

