WATCH YOUTUBE TUTORIAL:
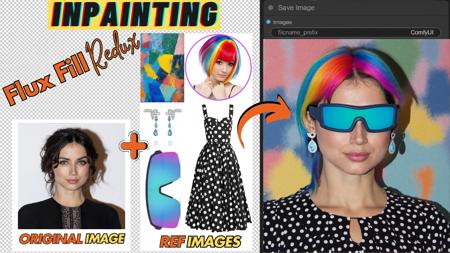
Welcome back to AI Motion Studio! In this Part 2 of our in-depth tutorial series, we are diving into the power of manual masking with the ultimate combo of the Flux Tools Fill Dev Model and Flux Redux in ComfyUI. If you enjoyed our previous walkthrough—where we utilized Florence2 and SAM2Segmentation to automatically mask regions for effortless inpainting—get ready to level up your editing skills by taking total control over how and where your masks are applied. This approach can yield even more precise and refined results, especially when working with intricate details or complex backgrounds.
We’ll showcase step-by-step how to create and refine manual masks that will help you achieve picture-perfect edits, whether you’re updating a subject’s attire, changing hair color, or even transforming entire backgrounds. We’ll also revisit the essential components you’ll need before getting started:
1. Flux Tools Fill Dev Model – Your go-to model for seamless and realistic inpainting.
2. FLUX 1 Redux Dev Model – Perfect for generating image variations while preserving the original aesthetic.
3. SIG CLIP Vision Model – Ensures accurate parsing of your prompts.
4. Flux Turbo Alpha LoRA – Speeds up generation without sacrificing quality.
Our tutorial begins with setting up all the necessary files in the correct folders. You can find links to each model on their respective hosting platforms—CivitAI and Hugging Face. After everything is in place, we’ll explain how to activate the manual masking workflow in ComfyUI. This will allow you to paint or erase areas for inpainting exactly how you envision them, without relying on the tool’s automated segmentation.
Once we’ve loaded our images, we’ll demonstrate how to apply masks manually. You’ll see firsthand the difference between drawing your own mask and using an automated tool: not only can you achieve hyper-specific selections, but you can also refine edges, feather transitions, and ensure that no background pixels are unintentionally altered. This is particularly valuable when you’re working with tricky spots like overlapping objects or fine details such as strands of hair, eyelashes, or small accessories.
Next, we’ll combine the manual mask approach with Flux Redux to add a layer of creativity and variation to the inpainted sections. Flux Redux helps preserve the essential features of the original image while introducing subtle, controlled differences—perfect for evolving one concept image into multiple refined designs. We’ll walk you through each step, from setting prompts to adjusting model sliders, to help you get the most out of your newly masked areas.
Whether you’re experimenting with backgrounds, changing facial features, or transforming an entire object, this workflow provides the precision you need to maintain visual integrity. We’ll also share additional tricks like using reference images to guide the inpainting process, ensuring that textures, colors, and overall styles are consistent with your creative vision. By the end of this tutorial, you’ll feel confident manually masking and inpainting even the most challenging images.
But that’s not all—if you run into any issues with missing nodes or errors, we’ll show you how to use the ComfyUI Manager to easily install or update the required custom nodes. This ensures your workflow stays current, stable, and ready for any creative challenge.
If you find this guide helpful, please hit the Like button and subscribe to our channel, AI Motion Studio! We’re committed to bringing you the best tips and tutorials for AI-powered design, so your support means everything to us. Be sure to comment below if you have any questions, and let us know what amazing creations you come up with using manual masking in ComfyUI!
描述:
Version 1.0
训练词语:
名称: ultimateFluxFillInpainting_v10.zip
大小 (KB): 4
类型: Archive
Pickle 扫描结果: Success
Pickle 扫描信息: No Pickle imports
病毒扫描结果: Success