 ------------------------------------------
## WORKFLOW GUIDE: DESCRIPTION
------------------------------------------
This production workflow called “EML_LTX_TTV/ITV” has advanced techniques to achieve quality video based on LTX-Video by Lightricks.
✅Works on graphics cards with 8GB VRAM and below!
✅Gathered the best techniques for using the model in one vorkflow?
✅ User-friendly interface
✅Three modes of operation: Text To Video, Image To Video and Inspiration Mode with one switch.
✅Generated Image Support: users often face the problem of “frozen video”, which is the problem of lack of noise in the image. This production process automatically adds noise via crf, which gives the neural network an understanding of the “Big Picture”. Detailed description in (1)
✅Support for STG Preturbed Attention
✅Automatic file renaming
✅ The sample comparison files are packed in zip, the workflow with parameters is saved in .mp4, just drag and drop it into the Comfy UI workspace.
✅Recognition of the image by the Florence2 model
✅Generation of complex promts with a single sentence based on LLM Mistral-7b
✅Save to MP4
✅Convenient list of aspect ratios.
✅Presets for camera and instructions from Runway and EML
By default the model has 768x512 resolution, aspect ratio is 3:2, use custom resolutions at your own risk, better choose from the official list in the node-helper “LTXV Model Configurator”. For Image To Video the side is determined automatically.
Workflow is taken as a basis:
XODA-LTXV https://civitai.com/models/974859
ComfyUI-LTXTricks https://github.com/logtd/ComfyUI-LTXTricks/tree/main/example_workflows
❤❤❤❤❤❤❤❤❤❤
⚠Note: Many nodes are directed through the “SetNode” and “GetNode” nodes to make the workflow cleaner.
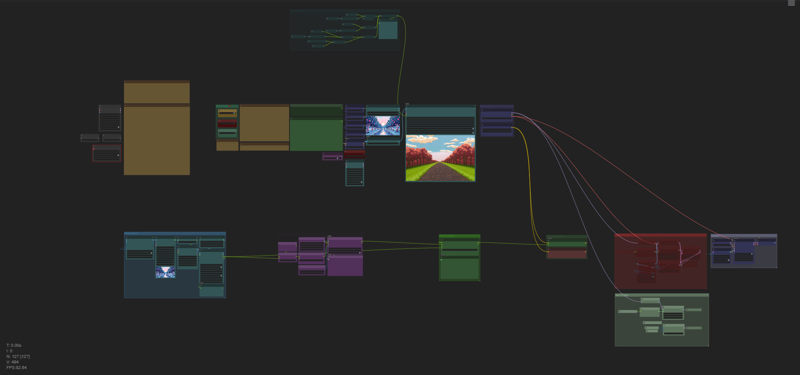
Workflow - Main simple UI:
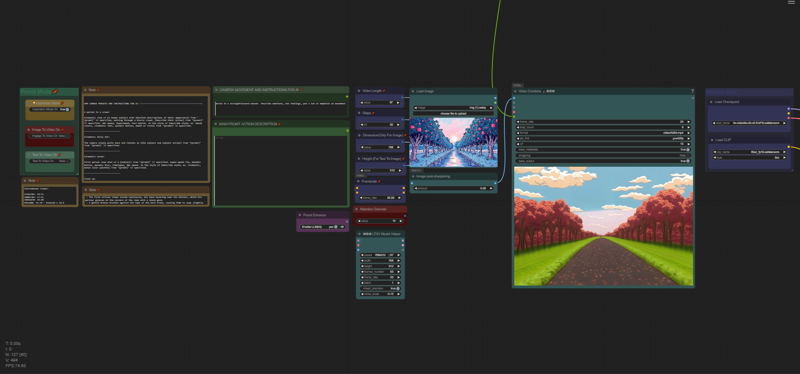
Workflow - AI Sector: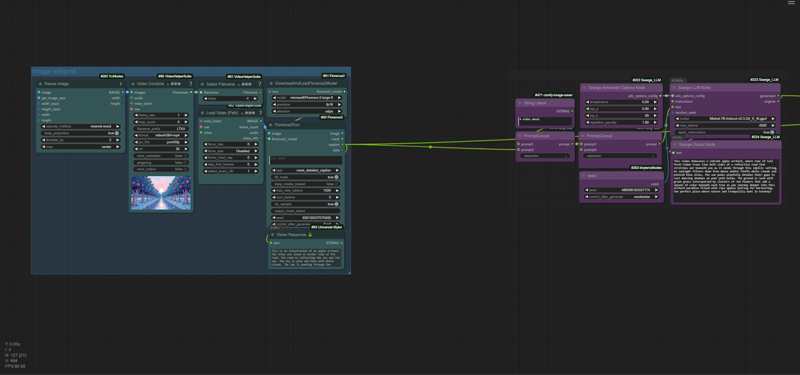
Workflow - Processors: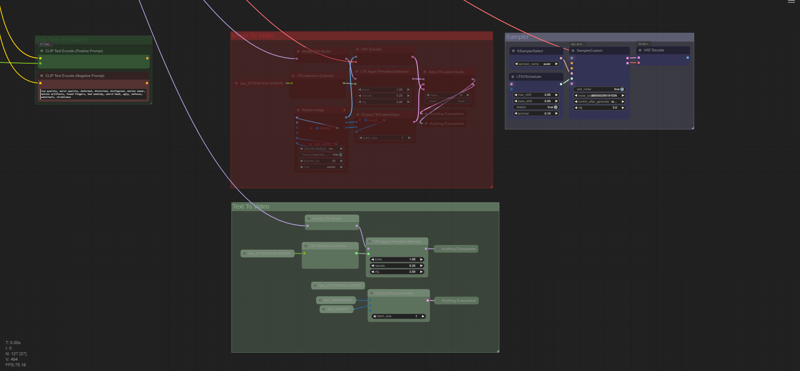
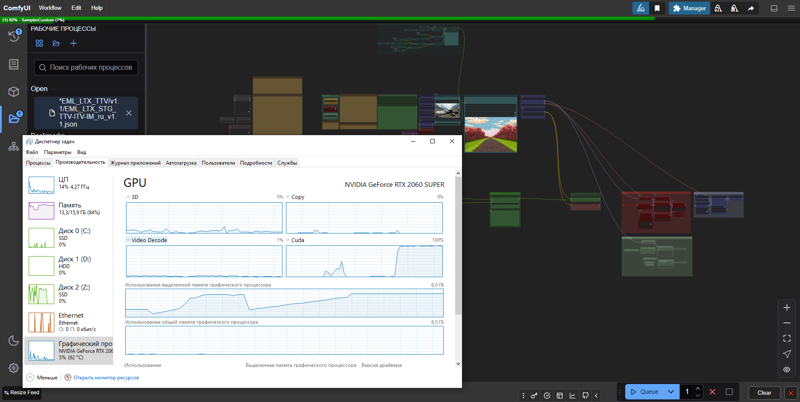
Actual Generation Speed on RTX 2060s 8GB VRAM, default settings, image to video:

VRAM Optimization:
------------------------------------------
## WORKFLOW GUIDE: PREPARATION
------------------------------------------
0. After starting the workspace, you will most likely be missing the nodes you need.
Go to Manager -> Install Missing Custom Nodes -> Select all (next to ID) -> Install
After installation, Comfy UI will ask to reboot, click and proceed to the next steps. The first run may be long due to downloading Florence2 models.
0.1 Select a model.
I prefer the ltx-2b-v0.9-bf16.safetensors model coupled with Mochi's t5xxl_fp16.safetensors.
https://huggingface.co/MayensGuds/ltx-video-quants
If you have a 6GB VRAM card and below try model ltx-video-2b-v0.9-fp8_e4m3fn.safetensors coupled with clip loader
t5xxl_fp8_e4m3fn.safetensors
Make sure the “ltxv” mode is activated
?Tip: use Flux1 to generate images as they use similar text conversion algorithms.
0.2 Download the LLM model mistral-7b-instruct-v0.3-q4_k_m.gguf
Create a new llm_gguf folder in the ComfyUI/models directory. Download the file Mistral-7B-Instruct-v0.3.Q4_K_M_M.gguf (4.37 GB). from the MaziyarPanahi/Mistral-7B-Instruct-v0.3-GGUF repository on HuggingFace.
0.3 Optimization Tips.
On my NVIDIA RTX 2060s 8GB VRAM graphics card, defaults of 768x512, 25 fps, 97 frames and 30 steps, yield ~10s/it, which equates to ~5 minutes per video. On the left side of the “??? LTXV Model Configurator” you can figure out the recomendation values.
The module, like all its clones in space is not connected to anything, it is used as a reference.
For acceleration it is better to reduce the number of frames than to change the resolution, but then the duration of the picture and the quality of understanding by the neural network will be less.
As a rule I have enough ~50 frames, which at 25fps = 2 seconds of video. You should also set >= 30 steps, as objects become more distinguishable and less susceptible to deformations. For tests you can use 20 steps. In summary, we get a good speed/quality balance, which when optimized is ~5s/it, which is 2 times faster and the total time is ~1:30 per video. For further processing (e.g. slowing down) two seconds of video should be enough to make a good frame.
Keep in mind that changing the duration affects the final result, and a long hint in this case may even improve the result.
## WORKFLOW GUIDE: VIDEO GENERATION
1.0. Prepare an image (THIS IS IMPORTANT!). The image should be a bit larger than the standard one, because at standard 768x512 a lot of details are lost, and also this way contributes to crf noise with more randomization. I don't know how much it affects me yet, but the results are much better and higher quality if you upload an image for example 1.5 times larger than the generated video. If you take a real footage, make sure the quality is not soapy. If you use image generators (which I strongly recommend), try to “catch the language of the neural network”, keep in mind that the quality should be good, but not crispy, otherwise the neural network will start to ripple and hallucinate (make sure yourself by adding sharpness to the image before uploading). It should look like oil paint, or like a repainted movie, but not like a processed photo. Perhaps even the quality of the photo ≠ the quality of the video. In Flux1, this is achieved by selecting the DCFG value and the following samplers: Euler or [Forge] Flux Realistic, together with the DDIM or Beta sampler, (although I like the result with video with DDIM). Check out the examples in the examples folder in the downloaded zip archive.
1.1 Upload image (load image>choose file to upload)
*Workflow will automatically match the description to the image.
2. Specify promt as director:
-- Description: you can switch between ImgToVideo, TextToVideo and Inspiration Mode in the “Promt Mode” mode selection group. Choose whether you will work with images, with text, or come up with a script based on Text To Image using Inspiration Mode. The main control panel is conveniently located at the top. The panel has basic settings that work well by default, but the whole secret to a good picture depends on the source material, whether it's a properly prepared picture, whether it's a quality promt, it will all depend on your directorial vision and experimentation skills.
--
2.(1). LLM Mistral-7b can generate cues based on your promts, for this purpose turn on “Enable LLM” in “Promt Enhance”, you need to write everything related to motion, light play and all such moving things, and Florence2 is responsible for static promt. For camera movements, the presets taken from the runway were used as a basis. To apply a preset, just copy the desired preset to the “CAMERA MOVEMENT AND INSTRUCTIONS FOR AI” window. There in this window you can also add wishes for the model, for example “The camera slowly pulls back from ‘{promt}’. within 50 words and as straight as possible.”. This all especially affects the final result, so focus on this part and experiment. You will need to write in the “MAIN PROMT: ACTION DESCRIPTION” box a description of what the preset requires, i.e. anything within [], e.g. [the subject action]. I suggest you use the enhanced mode, despite the “Disney and Pixar princesses with sparkles of light on the young heroine's face” hallucinations, the neural network can actually be tuned for more direct requests in the same “CAMERA MOVEMENT AND INSTRUCTIONS FOR AI” window.
⚙ At the moment, the customization of presets is quite ambiguous, texts are held. Also share your observations!
2.(2). Manual mode:
- Write simply and clearly. I would even say straightforward.
- Describe what will happen in the frame: Someone will walk, turn around, show where the scene will go next.
- Emphasize the genre and tone of the scene (realistic, cinematic, cartoonish).
Indicate if the scene is inspired by a specific media format (movie, animation, photography).
- Will the camera stand still or move forward, behind the character, around the character, or some special kind of
first-person view.
Example:
Two police officers in dark blue uniforms and matching hats enter a dimly lit room through a doorway on the left side of the frame. The first officer, with short brown hair and a mustache, steps inside first, followed by his partner, who has a shaved head and a goatee. Both officers have serious expressions and maintain a steady pace as they move deeper into the room. The camera remains stationary, capturing them from a slightly low angle as they enter. The room has exposed brick walls and a corrugated metal ceiling, with a barred window visible in the background. The lighting is low-key, casting shadows on the officers' faces and emphasizing the grim atmosphere. The scene appears to be from a movie or television show.
?Tip: use DeepL AI browser extension in the google store to translate the text if you are not an English speaker. Highlight the text and press ctrl + shift + x, selecting the translation language beforehand.
Official Instructions:
Start with main action in a single sentence
Add specific details about movements and gestures
Describe character/object appearances precisely
Include background and environment details
Specify camera angles and movements
Describe lighting and colors
Note any changes or sudden events
More detailed instructions next to the Promt window (under camera presets).
2.(3). Inspiration Mode:
I have done tests and this mode shows average to poor results if you leave the field blank. This is happening due to a misinterpretation of the promt neural network as it is honed on images and not motion, so I . Write a couple of clarifications:
“she's crying”, ‘the person is walking’, ‘he's dancing’,
or more complex ones, like the examples above:
“he looks at the camera, then turns around, the camera looks away at the dancing peacock”
All the clues in this paragraph are interrelated and have a common rule for all three paragraphs that promts should be clear and straightforward, describing feelings is hardly appropriate here as these are internal experiences, the alternative to feelings is emotions, we can see them.
? Tip: Visit Runway Academy for a better understanding of how video generators work.
https://help.runwayml.com/hc/en-us/articles/30586818553107-Gen-3-Alpha-Prompting-Guide
p.s. Which would I prefer? Answer: Image To Video, as I like the level of final quality, albeit with less motion detail.
3. All the customization is located next to the promt input. If you need a more exotic setting, try spinning Prebuted Attention. From the main parameters we have “Video Length”, “Steps”, “Dimension” and “Framerate”
3.1 You can also turn CFG. By default - 3.0, the official recomendation 3.0-3.5, but many use 5, this parameter according to my observations is needed for more moving results, or more contrasty picture, but on text encoders from PixArt-XL-2-1024-MS model produces more stable results, judging by the video on YouTube, and also require more memory, so for weak video cards use less intense values of 3.0-3.5. I still haven't fully figured out how this affects it though.
3.2 If you're a fan of surrealism, horror movies, or just a fan of the uncanny valley, use Attention Override values >20 (Default 14).
3.3 There are 2 nodes “Dimension(Only For Image)” and “Height (For Text To Image)” which work like this: Dimension automatically selects resolution for images and Height is used in Text To Image as height, but in this mode Dimension is responsible for latitude. Done for convenience to.
Official manual:
4. Click Queue and wait for the result. Files are saved in the ComfyUI\output folder, the output is video: .mp4 (along with workflow and parameters sealed in the file) and temporary images .png, you can delete them.
?Tip: You can remove .mp4 from the .mp4 chain and add a “SaveAnimatedWEBP” node and save the video in .WebP without losing quality. If you need to convert webp format to any other format, download my webp converter
▶️ https://github.com/dvl12000/webp-converter/releases/tag/v1.0.1
?Tip: After processing, try enlarging the image x2 or x4 times in Topaz Video AI in “Theia” mode, add Sharpen ~50 and Apply Grain by default. This will make a really big improvement!
----------------------------
Rate the build, leave a comment and happy generations! ?
描述:
??Changes in EML_LTX_TTV-ITV-IM_STG_1.1 version
✅Now works on graphics cards 8GB VRAM and below!
✅ New user-friendly interface
✅ Added Promt Enhance switch
✅ Removed Llama 3.2 and replaced it with more power efficient Mistral-7b-instruct-v0.3-q4_k_m.gguf
?Inspiration Mode - New feature that allows you to generate promts based on an image using Text To Image
✅Presets for camera from Runway and EML, as well as a block for instructions in one node
✅Added support for STG Preturbed Attention
✅Files are now automatically renamed with specified parameters
✅Added examples. Comparison files bundled in zip, workflow with parameters stored in .mp4, just drag and drop it into your Comfy UI workspace.
✅Developed manual
训练词语:
名称: emlLTXSTGTTVITVIMV11_v11.zip
大小 (KB): 13207
类型: Archive
Pickle 扫描结果: Success
Pickle 扫描信息: No Pickle imports
病毒扫描结果: Success